YOUR LEARNING SPACE • STEP BY STEP
Student & parent guide
This guide is for adult students and parents managing their children’s lessons. It explains how to add a learner, request and check a booking, enter the private classroom, and download shared materials. Keep the portal open beside the guide and follow each task in order.
Open learning portal ↗ (in a new tab)Screenshots show the English student interface with example data, not real student records. Some example names and lesson titles are in Arabic. Your dates and titles will differ. Classroom images show the portal’s entry and waiting controls; they do not include the video provider’s call interface.
Open your learning portal
- Choose Continue with Google, select your own Google account, and complete the Google sign-in steps.
- For a child, the parent or guardian signs in with their account and adds the child’s learner profile. Do not use the teacher’s account or ask for her password.
- Use the same Google account on future visits. Your learner profiles, bookings, and shared materials are linked to it.
- If the portal is in Arabic, select English at the top. To switch Google accounts, choose Sign out first, then sign in with the intended account.
You do not create a separate website password. Never share your Google password or sign-in codes, including when asking for help.
Back to contents ↑Get to know your portal
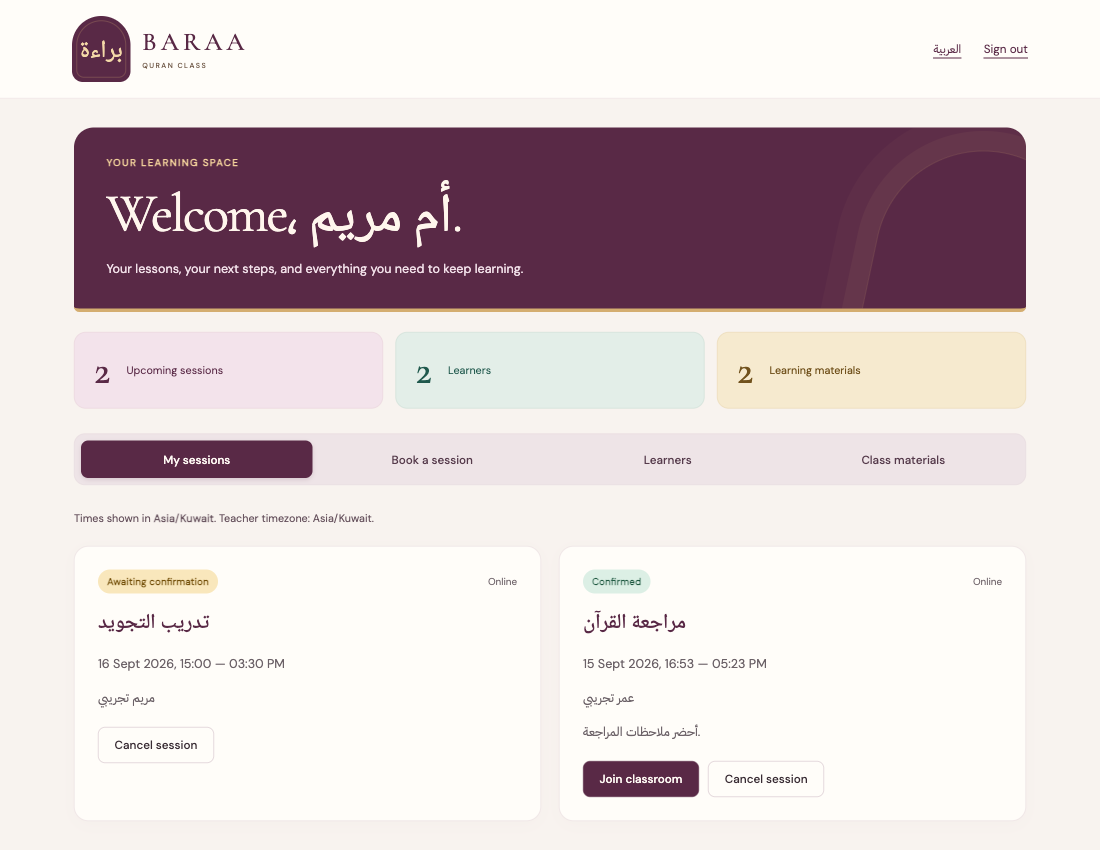
- Check the name at the top to make sure you used the correct account. If your records are missing, check the Google account before creating anything new.
- Open My sessions to see your requests, confirmed bookings, and their details.
- Open Book a session to choose from times the teacher has published. These are available to request and need confirmation.
- Open Learners to add yourself or your child. One account can manage several learners.
- Open Class materials to access files the teacher has shared with your learners.
The numbers at the top are a summary. Open the session card to read its status, date, time, and learner name. A session counted in the summary is not necessarily confirmed.
Session times use your device’s timezone, shown above the session list. Check it when travelling or after changing device settings. For example, 3 pm in Kuwait is 4 pm in the UAE.
Back to contents ↑Add a learner profile
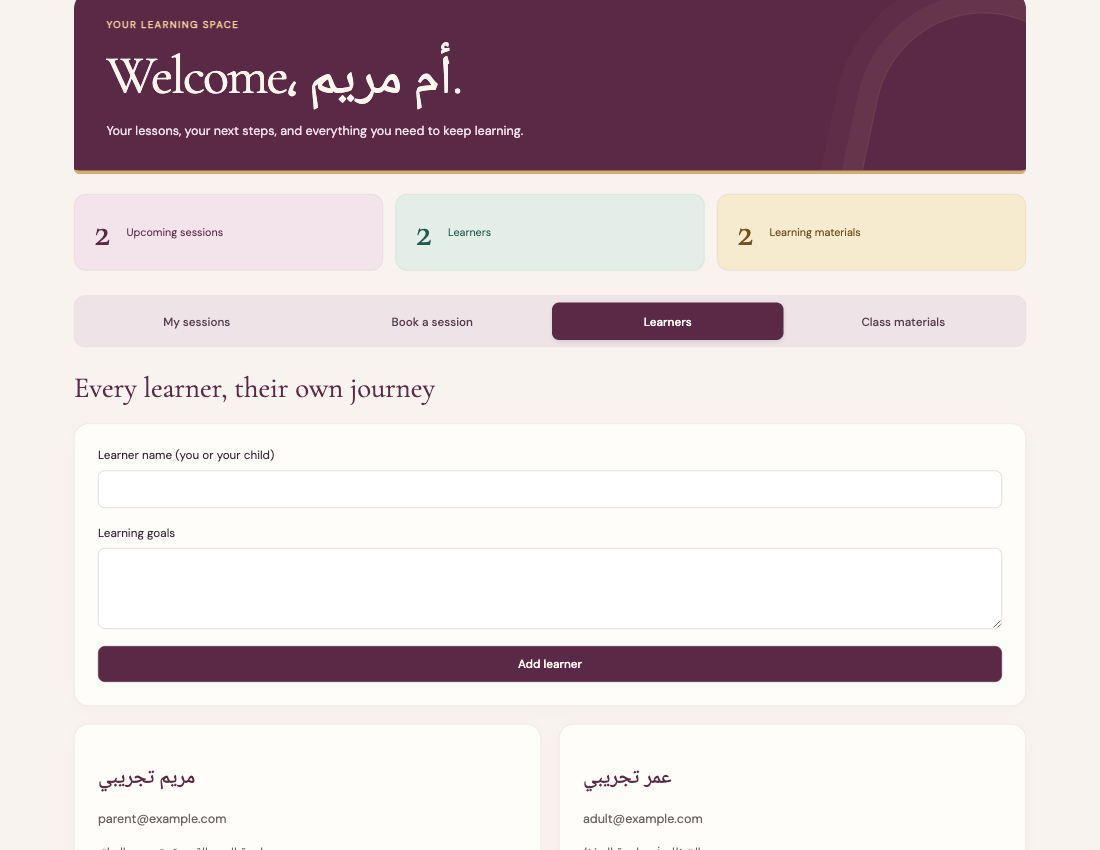
- Choose Learners. If the person is already listed, use their existing profile instead of adding them again.
- In Learner name (you or your child), enter the person who will take the lesson. If you are the adult student, enter your own name.
- In Learning goals, write a short description such as improving Tajweed or revising short surahs. Avoid personal information that is unnecessary for teaching.
- Click Add learner once and wait for the save to finish.
- Check that the learner’s card appears below the form. Repeat for another child if needed, then go to Book a session.
Your Google account identifies the person responsible for signing in. A learner profile identifies the person attending the lesson. Choose the correct child when making each booking.
If an existing learner’s name or details need correction, contact the teacher rather than making a duplicate. This form does not offer editing or deletion of an existing profile.
Back to contents ↑Choose a time and request a session
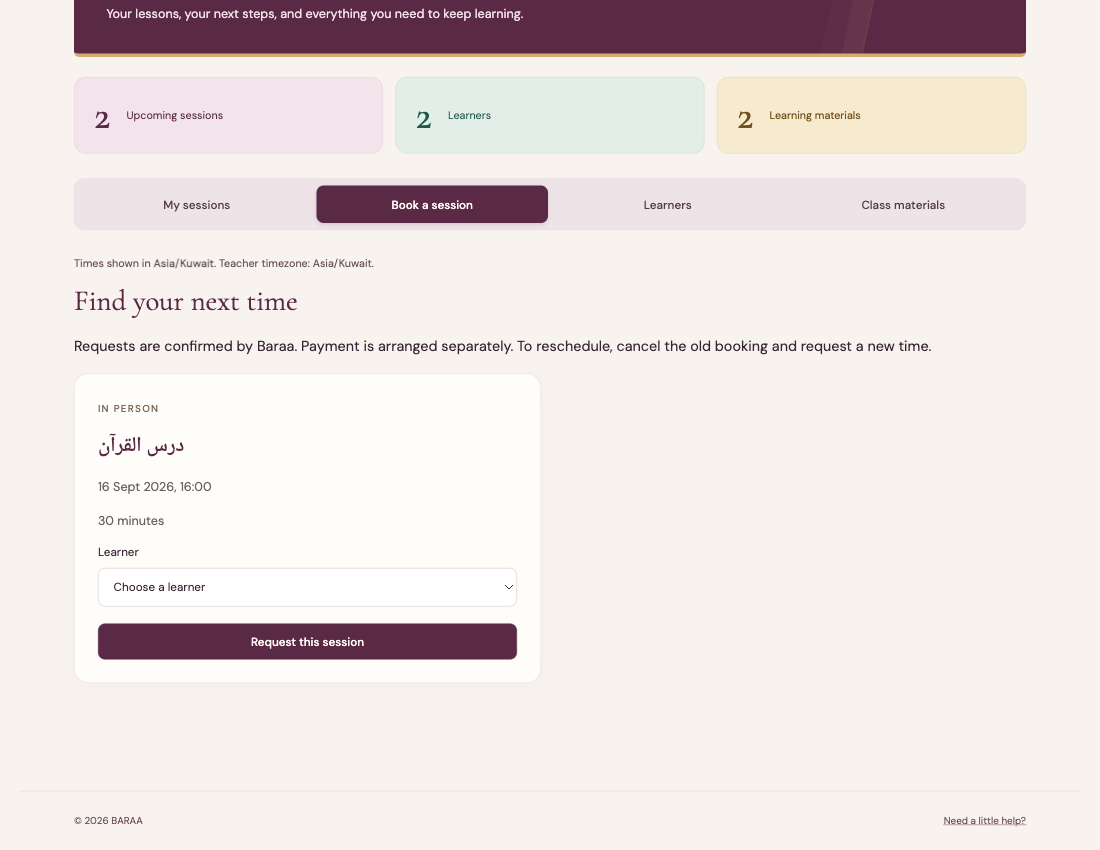
- Open Book a session. If you see Add a learner first, complete the Add a learner profile section and return here.
- Review the available lessons. Check the title, date, time, duration, and whether the format is Online or In person.
- Choose the correct person from Choose a learner inside the card for your preferred time.
- Click Request this session once. Wait for the request-received message and the return to My sessions.
- Find the new booking in My sessions. Check the name and time and look for Awaiting confirmation.
A request becomes a confirmed booking only after Baraa approves it. Payment is arranged separately; choosing a time here is not a payment transaction.
If there are no times, check back later or contact the teacher. If someone takes a time while you are choosing it, refresh and select another. Check My sessions before submitting the same request again.
Back to contents ↑Check confirmation and booking details
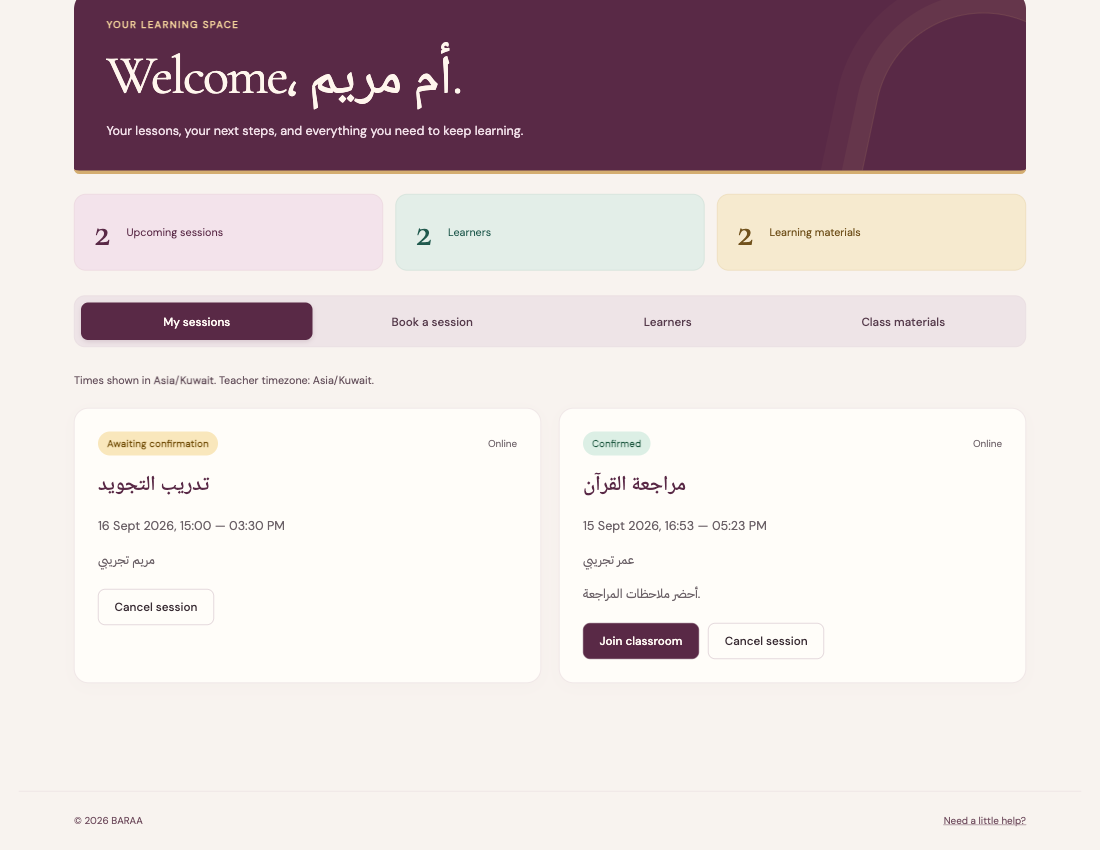
- Open My sessions and find your booking. Read the date, start and end times, and learner name.
- Awaiting confirmation means the teacher has not approved the request yet. Wait for her review; submitting a request is not final approval.
- Confirmed means the booking is accepted. Read any notes and the location for an in-person lesson.
- Confirmation adds an email to the sending queue for the linked account. Check your inbox and spam folder, and check the portal status too.
- If the teacher books a student herself, the session may appear as Confirmed without a request from you. Check its learner and time before attending.
Cancelled means the appointment is no longer going ahead. Completed means it was recorded as finished. You do not need to book an already-confirmed session again.
If a change is not visible immediately, refresh once. If an email differs from the current portal status, ask the teacher to clarify the appointment before attending.
Back to contents ↑Cancel or change your booking
- Open My sessions and carefully identify the booking, especially if your account includes more than one child.
- Before the start time, requested or confirmed sessions show Cancel session. Click it only if you want to cancel.
- Read the confirmation prompt. Accept to cancel, or dismiss it if you clicked by mistake.
- Wait for the list to update and check for Cancelled. Do not assume cancellation worked if an error appeared.
- To change the time yourself, cancel the old booking, open Book a session, and request a new time. The new request needs the teacher’s confirmation.
If the session has already started
The student interface does not allow cancellation after the start time. Contact the teacher if you are late or need a change. Do not make extra bookings to work around the problem without agreeing with her.
Before cancelling a confirmed appointment
Review alternative times first, or speak with the teacher if moving to a particular time is essential. Cancelling the old booking does not reserve a replacement. Someone else may request an available time before you finish.
Payment arrangements
Payments are arranged separately with the teacher. The portal’s cancellation button does not promise a refund or waive fees. Ask her about the arrangement you agreed.
Back to contents ↑Prepare and open the lesson page
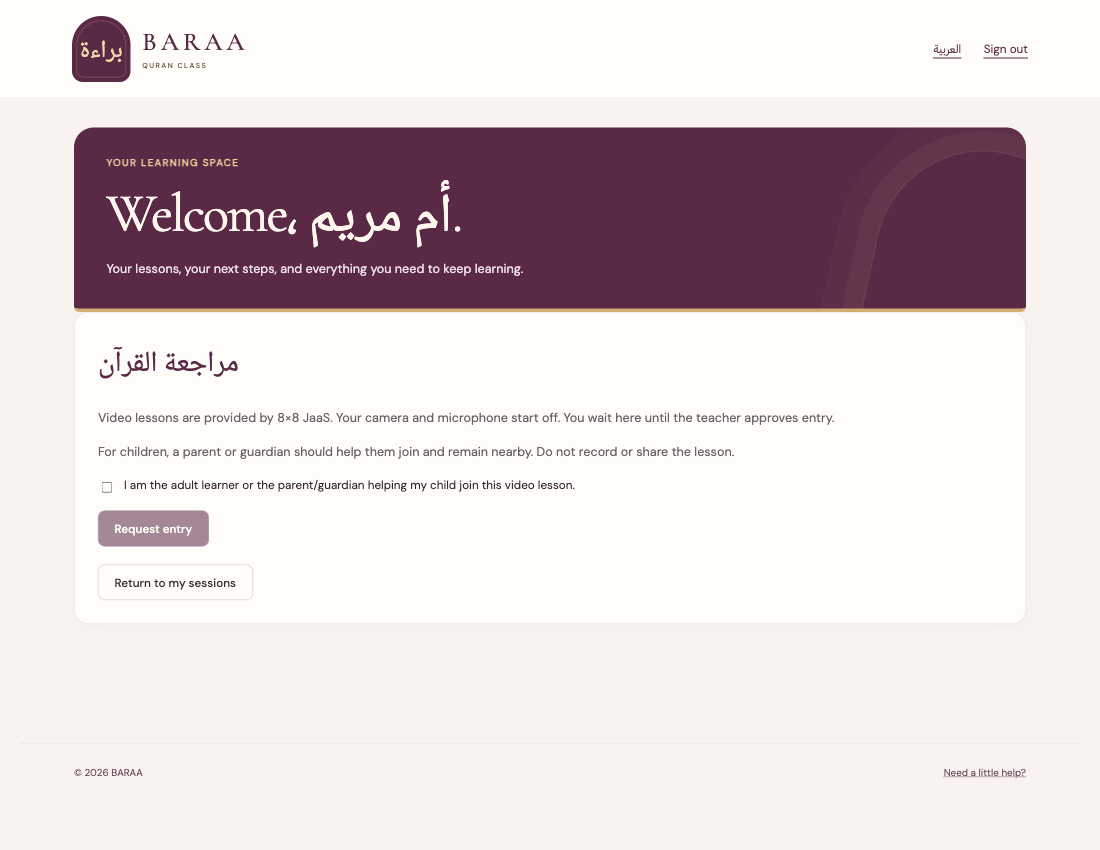
- Before the lesson, prepare an internet-connected device in a quiet place and open any materials requested by the teacher.
- Sign in with the account that booked the session. Open My sessions and find the confirmed lesson for the correct learner.
- For an online lesson, choose Join classroom. Entry is allowed from 15 minutes before the start until 15 minutes after the end. Seeing the button early does not extend this window.
- Read the instructions. Tick the acknowledgement that you are the adult learner or the parent or guardian helping your child join.
- Click Request entry. The teacher must have opened the classroom for admission to proceed.
For a child, a parent or guardian helps them join and stays nearby. Do not forward the room link to others or record or circulate the lesson. In-person lessons do not need a video room; check the location with the teacher.
Back to contents ↑Wait for the teacher to admit you
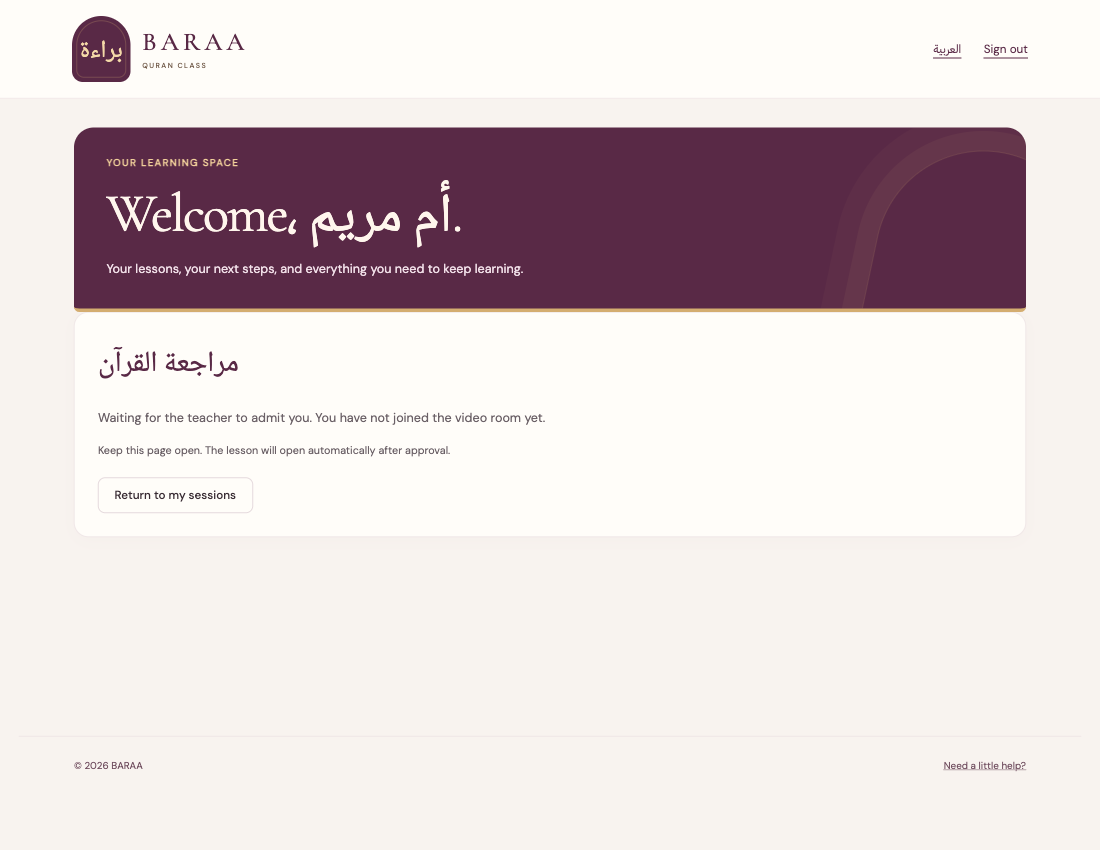
- After requesting entry, look for Waiting for the teacher to admit you.
- Keep this page open. The portal opens the lesson automatically after approval; you do not need a different link.
- When the browser requests camera or microphone permission, allow it for the lesson, then review the device check before joining.
- If asked to wait for the teacher to open the room, wait briefly and use Try again after she opens it.
- If the request expires, request entry again. If it is declined, contact the teacher before retrying.
A different device or a new sign-in session may need a new approval. Each sign-in session has its own request, so approval on one device may not apply to another.
If the wait seems long, check the booking time, account, and learner name, then tell the teacher what is shown. Do not switch accounts at random: the booking belongs to the original account.
Back to contents ↑During the lesson and when it ends
Turn on sound and camera
- The camera and microphone start off. Turn them on using the call controls as directed by the teacher.
- If you cannot hear, check volume, mute settings, and the selected microphone and speaker. Headphones can reduce echo.
- If you denied browser permission accidentally, open the site’s browser settings, allow camera or microphone access, and retry.
Follow the materials and whiteboard
When the teacher shares a screen or board, check you can see it clearly and tell her immediately if you cannot. Follow her reading or writing instructions. Showing a file during the call does not automatically add it to Class materials; she may share it there separately.
If the connection drops
Check your internet connection, return to My sessions, and open the same lesson. You may need a fresh entry request and approval. If the classroom has closed permanently, it cannot be reopened for that session; contact the teacher.
Finish the lesson
- Wait until the teacher finishes and agree what to practise before the next lesson.
- The teacher ends the lesson for everyone. Return to my sessions takes you back to your list; it does not end everyone’s call.
- Afterwards, open Class materials for shared files and check your next appointment.
- Use Sign out when you finish on a shared device.
The video provider’s controls and their placement can vary by device. This guide does not show the video interface itself. Ask the teacher or your parent for help if you cannot find a control.
Back to contents ↑Download and review learning materials
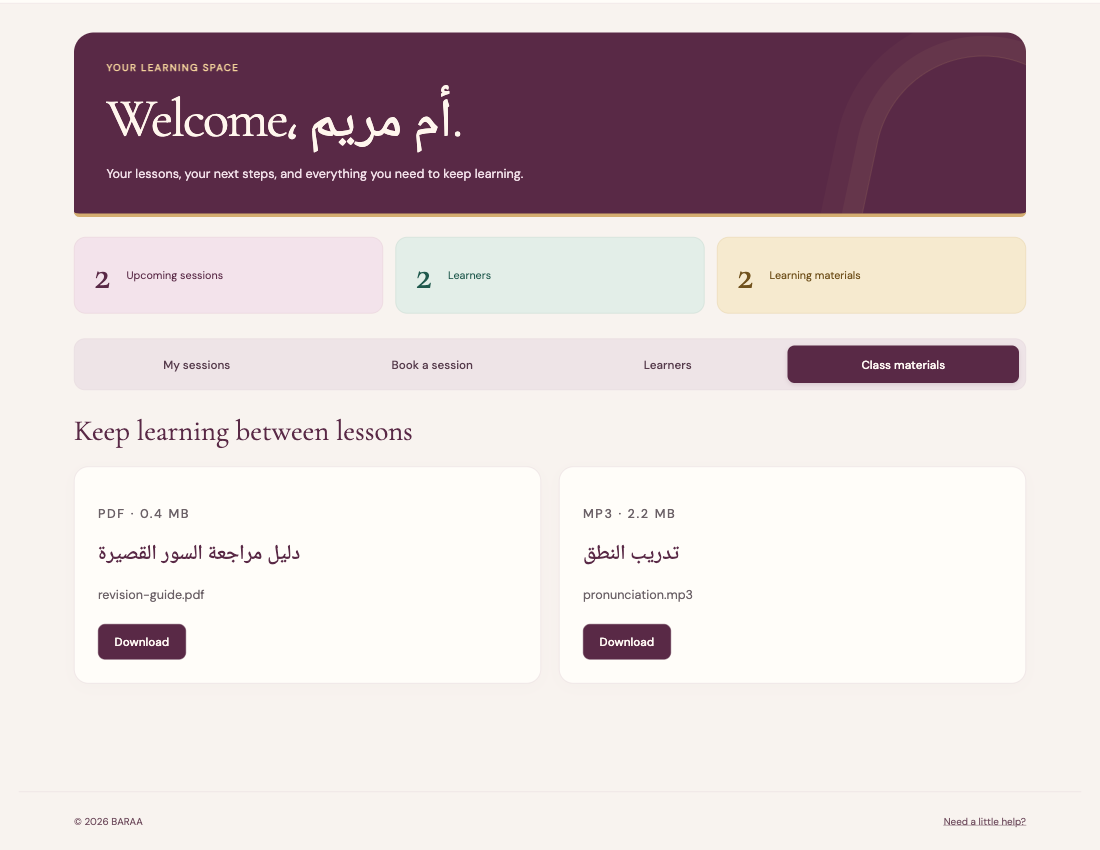
- Sign in with the account linked to the learner, then open Class materials.
- Identify the file by its title and filename. Each card also shows the file type and size.
- Click Download once. Depending on your device, the file may open in the browser or save to Downloads.
- Open the reading file or audio recording and practise what you agreed with the teacher.
- On a shared device, store materials appropriately and sign out of the portal afterwards.
A file may be shared directly with a learner or through a class the teacher enrolled them in. You do not need to upload files yourself. The student interface has no homework-upload form; agree with the teacher how to send any required work.
If a file is missing, refresh and check the account, then ask the teacher about sharing. Forwarding a download link does not give another person access. Do not publish the teacher’s materials without permission.
Back to contents ↑Solve common problems
My bookings or child’s files are missing
Check the Google account you used. Sign out and return with the original account. Do not create a duplicate learner before checking. If the issue continues, tell the teacher the learner’s name without sharing your password.
No times are available or booking fails
Make sure a learner profile exists and is selected. Times may not be published yet, or someone may have booked one while you were choosing. Read the error, refresh, or ask the teacher for another time. Check My sessions before resubmitting.
The booking still awaits confirmation
Submitting a request does not confirm it. Wait for the teacher’s approval and contact her if the time is approaching. Do not create duplicate requests to resolve the wait.
The classroom is missing or video will not open
Check the lesson is Online and Confirmed, and verify the entry window, timezone, and account. Read the error: you may need to wait for the teacher or request entry again. Check internet and camera and microphone permissions.
The email has not arrived
Check the inbox and spam folder for the Google account used to book. Check the portal’s booking status too. If it does not arrive, tell the teacher the lesson time and current status.
A file will not open or asks me to sign in
Sign in again if your session expired, then open the file from Class materials. If access is denied, check that the teacher shared it with the correct learner. If downloaded, look in Downloads and open it with an application that supports the file type.
What to include when asking for help
Give the section and button, exact error, time and timezone, device, and browser. Attach a screenshot with other people’s details hidden if useful. Never send passwords, Google codes, or sign-in tokens.
Back to contents ↑Quick checklist and contacting the teacher
Before your first booking
- Sign in with your own or the correct parent account.
- Add the person taking the lesson and check their name.
- Choose a suitable time and format and send the request.
- Check it appears in My sessions and wait for Confirmed.
Before each online lesson
- Check the date, time, timezone, and learner name.
- Prepare the device, internet, headphones, and requested materials.
- Open the confirmed session within the entry window and request entry.
- Keep the page open until the teacher admits you. A parent stays nearby for a child.
After the lesson
- Review the instructions and shared materials.
- Check your next appointment.
- Sign out if you are using a shared device.
Contact and enquiries
To ask about lessons or available times, use the website contact form or the round WhatsApp button. WhatsApp opens a prepared enquiry to +971 50 204 5667. Review it and send it yourself; clicking the button alone does not send a message.
A WhatsApp conversation or contact enquiry does not automatically create a booking. Check that the appointment appears and is confirmed in My sessions. Agree separately with the teacher about payments and any changes the portal does not allow.
Back to contents ↑